
In my last post, I showed you how to add named parameters to a Python script. These parameters –extension and –directory gave us the ability to run our programs with different extensions and located in different directories. This article will add the same functionality to the C# version of this program.
Where Python has an argument parser built into its native libraries, the .NET platform does not. Not to fear, there is a third-party library that you can install to add this needed functionality. This library is called CommandLineParser and can be installed via a Nuget package. You can install this library via the Nuget console by issuing the following command:
Install-Package CommandLineParser -Version 2.8.0
Once you have installed this library you need to build a class that will hold your parsed command line parameters. This class will be augmented with Attributes provided by the command line parser. The first parameter to add is the dynamic extension. To do this add the following class code to your program:
public class Options
{
  [Option(longName:"extension",HelpText = "Extension of files to convert",Default = ".mpg")]
  public string Extension { get; set; } = "";
}
This code has a string property called Extension. When you pass in the –extension parameter it will be stored on this property. The more interesting aspect of this class is the [Option] attribute.
[Option(longName:"extension",HelpText = "Extension of files to convert",Default = ".mpg")]The longName property tells the CommandLIneParser library to parse an argument with the name –extension onto the Extension parameter. The HelpText and Default properties are self explanatory based solely on their name.
Now that you have created this class you can call the command line parser to populate your arguments onto an instance of the Options class. This code demonstrates how to do this:
var parsed = Parser.Default.ParseArguments<Options>(args);
var options = ((Parsed<Options>) parsed).Value;
This code takes the args collection passed to your program, parses them, and returns a parsed object. After parsing the argument collection you need to cast the .Value property of the parsed object into an instance you can use in your programming code. Your processing logic will now look like this:
var directory_to_import = "D:/Data/clients/RodPaddock/CCExtractor/";
var extractor_exe_path = "D:/Data/clients/RodPaddock/CCExtractor/ccextractorwin";
foreach (var fileName in Directory.GetFiles(options.Directory,$"*{options.Extension}"))
{
  Console.WriteLine(fileName);
  var process = new Process()
  {
    StartInfo = new ProcessStartInfo
	  {
  	    FileName = $"{extractor_exe_path}",
  	    Arguments = $"{fileName}",
	    UseShellExecute = true,
	   }
   };
	process.Start();
 }
Notice that the GetFiles() function now uses the Extension property of your Options class.
The next step is to add the directory to your Options class. To do this, simply add another property to your class with the appropriate name and options. Your class code will now look like this:
public class Options
{
  [Option(longName:"extension",HelpText = "Extension of files to convert",Default = ".mpg")]
  public string Extension { get; set; } = "";

  [Option(longName: "directory", HelpText = "Directory to process", Default = ".")]
  public string Directory { get; set; } = ".";
}
Notice that the DefaultValue property is a single period (.). This tells the get files routine to simple process the current directory.
Now you can incorporate your new Directory option into your application code. This is what the final version will look like:
using System;
using System.Diagnostics;
using System.IO;
using CommandLine;

namespace ExtractorRunner
{
	class Program
	{
		static void Main(string[] args)
		{

			var parsed = Parser.Default.ParseArguments<Options>(args);
			var options = ((Parsed<Options>) parsed).Value;

			var extractor_exe_path = "ccextractorwin";
			foreach (var fileName in Directory.GetFiles(options.Directory,$"*{options.Extension}"))
			{
				Console.WriteLine(fileName);
				var process = new Process()
				{
					StartInfo = new ProcessStartInfo
					{
						FileName = $"{extractor_exe_path}",
						Arguments = $"{fileName}",
						UseShellExecute = true,
					}
				};
				process.Start();
			}

		}
		public class Options
		{
			[Option(longName:"extension",HelpText = "Extension of files to convert",Default = ".mpg")]
			public string Extension { get; set; } = "";

			[Option(longName: "directory", HelpText = "Directory to process", Default = ".")]
			public string Directory { get; set; } = ".";
		}
	}
}
One item of note is the path to the EXE is just the name of the application. This is because in the last post we decided to add the Ccexteactorwin.exe file to our system PATH via the System Environment variables screen..
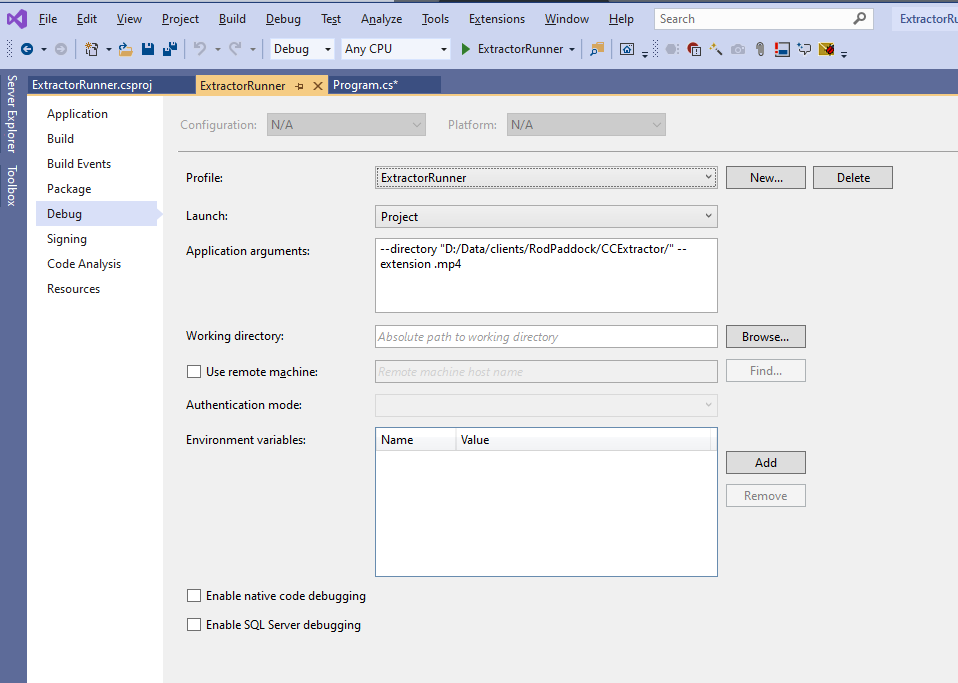
You can now run your code from visual studio. When testing your code you can call your application with arguments by opening your Project Properties Window, selecting the Debug section and passing specifying your parameters in the Arguments section. The following screen shows that:
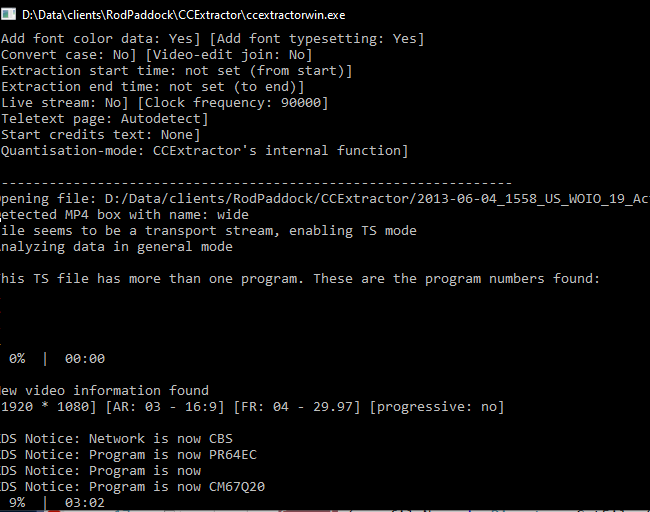
Your running program will now spawn a new process which looks like this:
At this point we have two programs one in Python and one in C#. They both accept similar named parameters and now call the ccextractor program based on global PATHs. Next step is to get the code running on platforms other than Windows.