Simple Cryptography With C#

One of the applications I’m working on has the need to store Privately Identifiable Information (PII) in it’s databases. We have chosen to store this information using the RSA Public Key Cryptography provider included in the .NET Core base libraries.

We all use Public Key Cryptography (PKC) every day. If you are reading this you are using PKC as the underpinnings of HTTPS use public key cryptography. Basically PKC is implemented using two individual keys the PUBLIC one and the PRIVATE one. The public key is used to encrypt data and the private key is used to decrypt data. As it name implies you can distribute the PUBLIC key … well… publicly. Meaning you can give it out freely. The PRIVATE key is yours and yours alone and is the only key that can decrypt your data.

For our needs we created a simple library for managing our PKC needs. This library has 3 parts:

1) Function to generate PUBLIC and PRIVATE keys
2) Function to encrypt a string
3) Function to decrypt a string.

Lets take a look at generating keys first. To to this you need to create a class that will be used to return the PUBLIC and PRIVATE key strings. The class looks like this:

public class KeyPair
{
	public string PublicKey { get; set; } = "";
	public string PrivateKey { get; set; } = "";
}

Next you need to create an instance of the RSACryptoServiceProvider class. When creating an instance of this class you need to pass it the size of your keys.

The size of the key specifies the strength of the key you are using. Meaning how difficult will it be to crack. The larger the more difficult it is to crack. Our code stores the size of the key in a CONST called Keysize. After creating an instance of the provider your an call the ToXmlString() of the provide which will return your PUBLIC and PRIVATE keys depending on the boolean you pass to the function. Passing a false value returns the PUBLIC key, passing a true value returns the private key. The following code shows how to create and return a PUBLIC/PRIVATE key pair.

using System;
using System.Security.Cryptography;
using System.Text;

namespace CryptoLibrary
{
	public class CryptoTools
	{
		private const int KeySize = 2048;

		public KeyPair GetKeyPair()
		{
			var provider = new RSACryptoServiceProvider(KeySize);
			var retVal = new KeyPair()
			{
				PublicKey = provider.ToXmlString(false),
				PrivateKey = provider.ToXmlString(true)
			};
			return retVal;
		}

	public class KeyPair
	{
		public string PublicKey { get; set; } = "";
		public string PrivateKey { get; set; } = "";
	}

}

Now you can call the library to generate your keypair.

var tools = new CryptoTools();
var keys = tools.GetKeyPair();

This code returns your keys in an XML string that looks like this:

<RSAKeyValue>
  <Modulus>vx53GKAPG02.......yQgyoVlAwYHZxP7jVTyQ==</Modulus>
  <Exponent>AQAB</Exponent>
</RSAKeyValue>

With these two keys you can write some simple functions to Encrypt and Decrypt strings. The steps to encrypt a string are:

1) Create an instance of the RSACryptoServiceProvider class.
2) Load the PUBLIC key using the FromXmlString() function.
3) Convert your string to a byte[] array
4) Encrypt the string (returned as byte[] array)
5) Turn the byte[] array into a base 64 string.
6) Return the string.

The steps to decrypt a string are:

1) Create an instance of the RSACryptoServiceProvider class.
2) Load the PRIVATE key using the FromXmlString() function.
3) Convert your string to a byte[] array
4) Decrypt the string (returned as byte[] array)
5) Turn the byte[] array into a UTF8 string.
6) Return the string.

The following code represents this functionality:

public string Encrypt(string publicKeyXML, string itemToEncrypt)
{
	var provider = new RSACryptoServiceProvider(KeySize);
	provider.FromXmlString(publicKeyXML);

	byte[] bytes = Encoding.UTF8.GetBytes(itemToEncrypt);
	var encryptedData = provider.Encrypt(bytes,true);
	var retval = Convert.ToBase64String(encryptedData);
	return retval;
}

public string Decrypt(string privateKeyXML, string itemToDecrypt)
{
	var provider = new RSACryptoServiceProvider(KeySize);
	provider.FromXmlString(privateKeyXML);

	byte[] bytes = Convert.FromBase64String(itemToDecrypt);
	var encryptedData = provider.Decrypt(bytes, true);
	var retval = Encoding.UTF8.GetString(encryptedData);
	return retval;
}

The following code shows how to generate keys, encrypt the data and descrypt the data.

var tools = new CryptoTools();
var keys = tools.GetKeyPair();
			
Console.WriteLine(keys.PublicKey);

var encrypted = tools.Encrypt(keys.PublicKey, "555-12-3456");
var decrypted = tools.Decrypt(keys.PrivateKey, encrypted);

var encrypted2 = tools.Encrypt(keys.PublicKey, "4000-0000-0000-0002");
var decrypted2 = tools.Decrypt(keys.PrivateKey, encrypted);

The complete library for these tools:

using System;
using System.Security.Cryptography;
using System.Text;

namespace CryptoLibrary
{
	public class CryptoTools
	{
		private const int KeySize = 2048;

		public KeyPair GetKeyPair()
		{
			var provider = new RSACryptoServiceProvider(KeySize);

			var retVal = new KeyPair()
			{
				PublicKey = provider.ToXmlString(false),
				PrivateKey = provider.ToXmlString(true)
			};
			
			return retVal;

		}

		public string Encrypt(string publicKeyXML, string itemToEncrypt)
		{
			var provider = new RSACryptoServiceProvider(KeySize);
			provider.FromXmlString(publicKeyXML);
			byte[] bytes = Encoding.UTF8.GetBytes(itemToEncrypt);
			var encryptedData = provider.Encrypt(bytes,true);
			var retval = Convert.ToBase64String(encryptedData);
			return retval;
		}

		public string Decrypt(string privateKeyXML, string itemToDecrypt)
		{
			var provider = new RSACryptoServiceProvider(KeySize);
			provider.FromXmlString(privateKeyXML);
			byte[] bytes = Convert.FromBase64String(itemToDecrypt);
			var encryptedData = provider.Decrypt(bytes, true);
			var retval = Encoding.UTF8.GetString(encryptedData);
			return retval;
		}
	}

	public class KeyPair
	{
		public string PublicKey { get; set; } = "";
		public string PrivateKey { get; set; } = "";
	}
}

I hope that you find these tools useful. In my next post I’ll show how to combine this solution and the hashing library shown in my Building a Simple C# Hashing Utility post to build a bit more holistic solution to handling encrypted data.

Console Apps in Python and C# (.Net Core) Part 4

At this point we have a pair of programs written in Python and C#. These programs are used to run the ccextractor program with extension and path parameters. The next step in our evolution is to run our code on other platforms namely macOS and Linux. This post will demonstrate running code on both of those platforms.

Running on macOS

Before you start working on the code, you’ll need to get your Mac set up to 1) Install the ccextractor application and 2) Python 3 code.

Installing the extractor is simple and is done via the Homebrew infrastructure used by Mac Developers. To install the ccextractor do the following :

Install Homebrew if it’s not already installed. Simply run this script (copied from https://brew.sh/ ) from a terminal window.

/bin/bash -c "$(curl -fsSL https://raw.githubusercontent.com/Homebrew/install/master/install.sh)"

Once you have installed Homebrew, you can install the ccextractor program by issuing the following command:

brew install ccextractor

After installing the ccextractor, test it by typing ccextractor from the terminal window. You should see a screen full of help information. Now insure Python3 is installed. From a terminal window type: python3

If Python 3 is installed you’ll see the Python’s interactive window. If no,t you may be promoted to install the Command Line tools for OSX. If so, run that installer. If the Command Line Tools installer does not run directions for installing Python 3 can be found here: https://docs.python-guide.org/starting/install3/osx/

Now it’s time to test the code. Clone this repo:

https://github.com/rjpaddock/ExtractorRunner.git

Now from a terminal window change into the folder where you cloned that repo and run the following command:

python3 run_cc.py --extension mpg --directory [[INSERT YOUR DIRECTORY HERE]]

You will be presented with the following error information:

Traceback (most recent call last):
  File "run_cc.py", line 15, in <module>
    subprocess.run([extractor_name,  os.path.join(args.directory, file)])        
  File "/Library/Developer/CommandLineTools/Library/Frameworks/Python3.framework/Versions/3.8/lib/python3.8/subprocess.py", line 489, in run
    with Popen(*popenargs, **kwargs) as process:
  File "/Library/Developer/CommandLineTools/Library/Frameworks/Python3.framework/Versions/3.8/lib/python3.8/subprocess.py", line 854, in __init__
    self._execute_child(args, executable, preexec_fn, close_fds,
  File "/Library/Developer/CommandLineTools/Library/Frameworks/Python3.framework/Versions/3.8/lib/python3.8/subprocess.py", line 1702, in _execute_child
    raise child_exception_type(errno_num, err_msg, err_filename)
FileNotFoundError: [Errno 2] No such file or directory: 'ccextractorwin'

This error is because the name of the ccextractor application is different in the Windows environment. Check out the last line. What is the fix for this ?

To fix this you need to call a different executable based on operating system. Lucky for us Python has a built in library for just such a thing. To check what platform your code is running import the platform library at the top of your python file

import platform

Next add the following code to your script:

extractorname = ''
if platform.system() == 'Windows':
  extractor_name = 'ccextractorwin'
elif platform.system() == 'Darwin':
  extractor_name = 'ccextractor'
elif platform.system() == "Linux":
  extractor_name = 'ccextractor'

Now run the application. Your script should start processing files with no error.

NOTE: The code in the Repository already has this change applied. You’re welcome 🙂

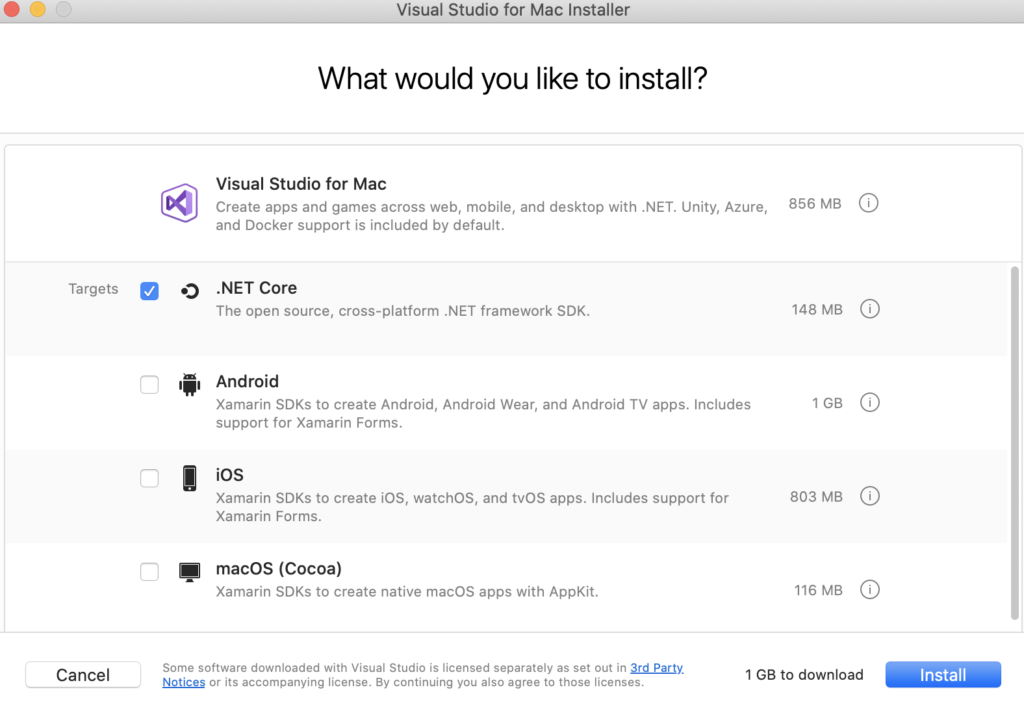
The next step is to get the C# code up and running on macOS. This process was much easier than I anticipated, as Microsoft has created a macOS version of Visual Studio. The first step is to install Visual Studio Mac from the Microsoft website https://visualstudio.microsoft.com/vs/mac/

When installing the application make sure to install it with the .NET Core option selected:

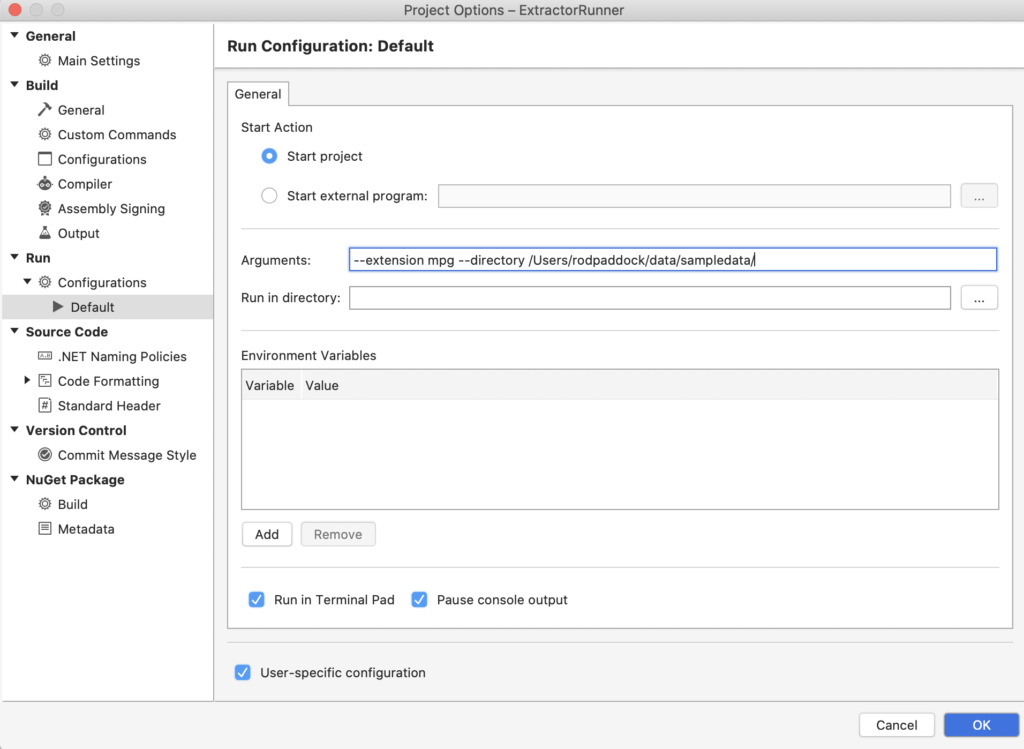
Once the installer completes, open the ExtractorRunner solution from the folder you pulled code into. Open the options dialog for the project and set the command line parameters you have been using to test:

Run your code now. You will now see an error in the console window of your application:

This is very similar to the Python error and requires the same solution. .NET Core also included a set or libraries to determine your operating system. Add the following snippet to the top of your program:

using System.Runtime.InteropServices;

Now add the following block of code to your C# program:

var extractor_exe_path = "";
if (RuntimeInformation.IsOSPlatform(OSPlatform.Windows))
  {
  extractor_exe_path = "ccextractorwin";  
  }
else if (RuntimeInformation.IsOSPlatform(OSPlatform.OSX))
  {
  extractor_exe_path = "ccextractorwin";
  }
else if (RuntimeInformation.IsOSPlatform(OSPlatform.Linux))
  {
  extractor_exe_path = "ccextractor";  
  }

Now run your code and you should see proper output in the runner window.

Now you have the same command line functionality for both the Python and C# versions of this program and can run the code on the Mac and Windows. Now lets take a look at the process of running thus under Ubuntu.

Running on Linux (Ubuntu)

Before modifying the our runner programs we need to install the ccextractor application on our Linux server. Directions for installing ccextractor on Linux can be found here: https://github.com/CCExtractor/ccextractor/wiki/Installation

Basically you pull the code from Github, and run the typical process of building applications in the Linux world. I was lucky as the code “just compiled” and ran using the instructions provided. Once I did that I had to make one simple change to the script and was able to execute our runner application. The branch of code to determine the proper program to run looks like this:

if platform.system() == 'Windows':
  extractor_name = 'ccextractorwin' 
elif platform.system() == 'Darwin':
  extractor_name = 'ccextractor'
elif platform.system() == "Linux":
  extractor_name = '/home/azureuser/data/projects/ccextractor/linux/ccextractor'

Now I was able to run the code using the same command line options we used on the Mac.

python3 run_cc.py --extension mpg --directory /home/azureuser/data/sampledata/

Now that the Python code is up and running you can turn your sites onto running the C# code next. To do this you need to first install the .NET Core SDK on your Ubuntu instance. This is done by following the directions from this page: https://docs.microsoft.com/en-us/dotnet/core/install/linux-ubuntu

If you are running a different flavor of Linux you can find directions on this page: https://docs.microsoft.com/en-us/dotnet/core/install/linux

Once you have the SDK installed , change into the folder where you cloned the GitHub repository and run the following command:

dotnet build

This will build an executable file and put it in a sub-folder (off the root of your code) in this location /bin/Debug/netcoreapp3.1 There is one more step though. Before you can run the code you need to change your Program.cs file to use the following executable selection code:

var extractor_exe_path = "";
if (RuntimeInformation.IsOSPlatform(OSPlatform.Windows))
  {
	  extractor_exe_path = "ccextractorwin";
	}
else if (RuntimeInformation.IsOSPlatform(OSPlatform.OSX))
	{
		extractor_exe_path = "ccextractor";
	}
else if (RuntimeInformation.IsOSPlatform(OSPlatform.Linux))
	{
		extractor_exe_path = "/home/azureuser/data/projects/ccextractor/linux/ccextractor";
	}

Run the dotnet build command again and change into that folder and run the following command:

./ExtractorRunner --extension mpg --directory /home/azureuser/data/sampledata/

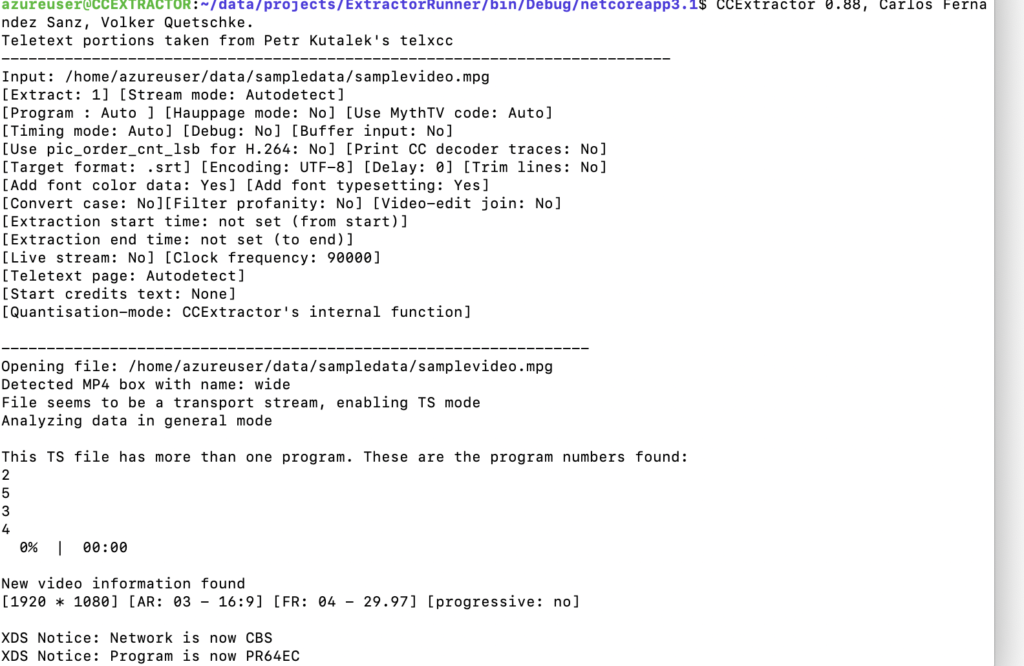
The following screen shows the ccextractor running on Ubuntu via the c# Extractorrunner program.

That’s how you create a totally cross platform application in Python and C#. I was pleasantly surprised how simple it was to build and run the C# code on Mac and Linux which is a testament to the work the Microsoft team has done over the last few years. I hope you enjoyed this series. Next week I hope to return with a recap of this series with a few additional tips. Then it’s on to writing about other programming items.

Console Apps in Python and C# (.Net Core) Part 3

In my last post, I showed you how to add named parameters to a Python script. These parameters –extension and –directory gave us the ability to run our programs with different extensions and located in different directories. This article will add the same functionality to the C# version of this program.

Where Python has an argument parser built into its native libraries, the .NET platform does not. Not to fear, there is a third-party library that you can install to add this needed functionality. This library is called CommandLineParser and can be installed via a Nuget package. You can install this library via the Nuget console by issuing the following command:

Install-Package CommandLineParser -Version 2.8.0

Once you have installed this library you need to build a class that will hold your parsed command line parameters. This class will be augmented with Attributes provided by the command line parser. The first parameter to add is the dynamic extension. To do this add the following class code to your program:

public class Options
{
  [Option(longName:"extension",HelpText = "Extension of files to convert",Default = ".mpg")]
  public string Extension { get; set; } = "";
}

This code has a string property called Extension. When you pass in the –extension parameter it will be stored on this property. The more interesting aspect of this class is the [Option] attribute.

[Option(longName:"extension",HelpText = "Extension of files to convert",Default = ".mpg")]

The longName property tells the CommandLIneParser library to parse an argument with the name –extension onto the Extension parameter. The HelpText and Default properties are self explanatory based solely on their name.

Now that you have created this class you can call the command line parser to populate your arguments onto an instance of the Options class. This code demonstrates how to do this:

var parsed = Parser.Default.ParseArguments<Options>(args);
var options = ((Parsed<Options>) parsed).Value;

This code takes the args collection passed to your program, parses them, and returns a parsed object. After parsing the argument collection you need to cast the .Value property of the parsed object into an instance you can use in your programming code. Your processing logic will now look like this:

var directory_to_import = "D:/Data/clients/RodPaddock/CCExtractor/";
var extractor_exe_path = "D:/Data/clients/RodPaddock/CCExtractor/ccextractorwin";
foreach (var fileName in Directory.GetFiles(options.Directory,$"*{options.Extension}"))
{
  Console.WriteLine(fileName);
  var process = new Process()
  {
    StartInfo = new ProcessStartInfo
	  {
  	    FileName = $"{extractor_exe_path}",
  	    Arguments = $"{fileName}",
	    UseShellExecute = true,
	   }
   };
	process.Start();
 }

Notice that the GetFiles() function now uses the Extension property of your Options class.

The next step is to add the directory to your Options class. To do this, simply add another property to your class with the appropriate name and options.  Your class code will now look like this:

public class Options
{
  [Option(longName:"extension",HelpText = "Extension of files to convert",Default = ".mpg")]
  public string Extension { get; set; } = "";

  [Option(longName: "directory", HelpText = "Directory to process", Default = ".")]
  public string Directory { get; set; } = ".";
}

Notice that the DefaultValue property is a single period (.). This tells the get files routine to simple process the current directory.

Now you can incorporate your new Directory option into your application code. This is what the final version will look like:

using System;
using System.Diagnostics;
using System.IO;
using CommandLine;

namespace ExtractorRunner
{
	class Program
	{
		static void Main(string[] args)
		{
			
			var parsed = Parser.Default.ParseArguments<Options>(args);
			var options = ((Parsed<Options>) parsed).Value;
			
			var extractor_exe_path = "ccextractorwin";
			foreach (var fileName in Directory.GetFiles(options.Directory,$"*{options.Extension}"))
			{
				Console.WriteLine(fileName);
				var process = new Process()
				{
					StartInfo = new ProcessStartInfo
					{
						FileName = $"{extractor_exe_path}",
						Arguments = $"{fileName}",
						UseShellExecute = true,
					}
				};
				process.Start();
			}

		}
		public class Options
		{
			[Option(longName:"extension",HelpText = "Extension of files to convert",Default = ".mpg")]
			public string Extension { get; set; } = "";

			[Option(longName: "directory", HelpText = "Directory to process", Default = ".")]
			public string Directory { get; set; } = ".";
		}
	}
}

One item of note is the path to the EXE is just the name of the application. This is because in the last post we decided to add the Ccexteactorwin.exe file to our system PATH via the System Environment variables screen..

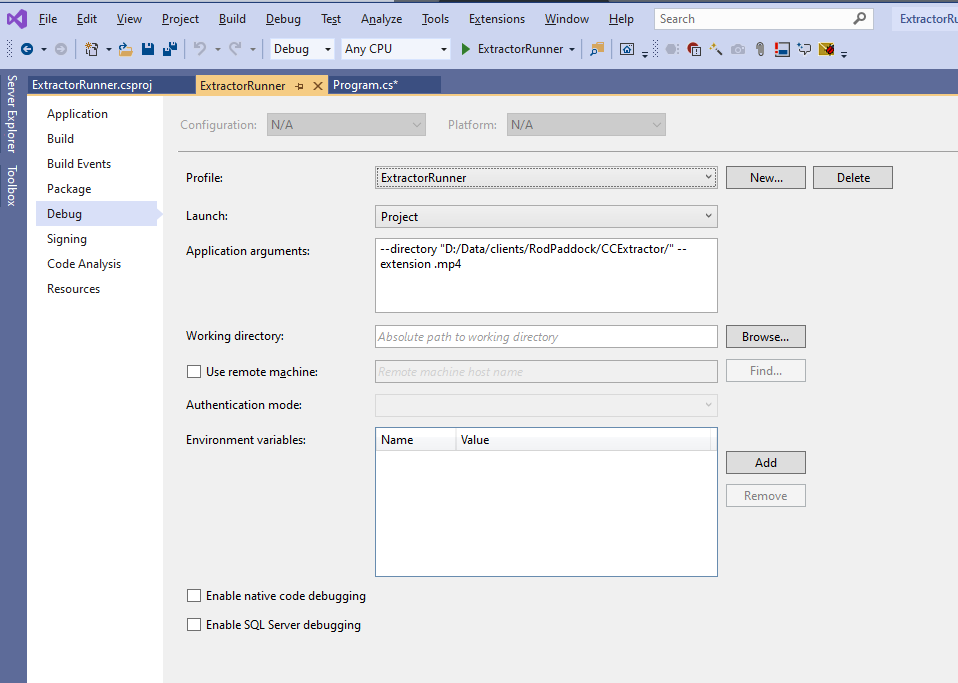
You can now run your code from visual studio. When testing your code you can call your application with arguments by opening your Project Properties Window, selecting the Debug section and passing specifying your parameters in the Arguments section. The following screen shows that:

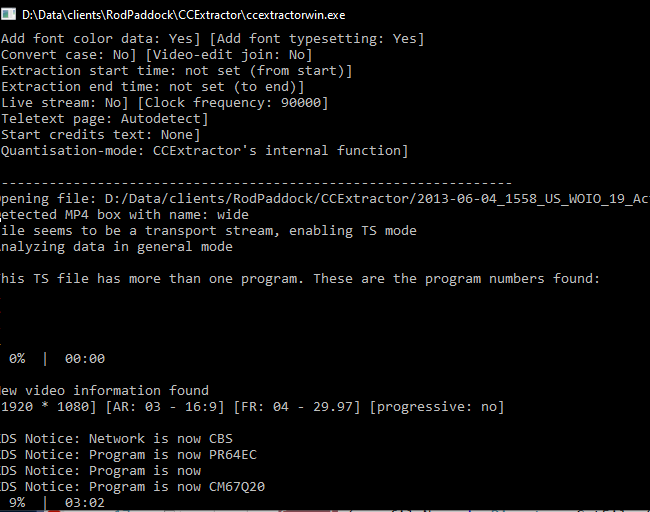
Your running program will now spawn a new process which looks like this:

At this point we have two programs one in Python and one in C#. They both accept similar named parameters and now call the ccextractor program based on global PATHs. Next step is to get the code running on platforms other than Windows.

Console Apps in Python and C# (.NET Core) Part 2

Sometimes time is of essence when building little utility programs. Once the job of your utility is completed it may be useful to make that program more useful and more universal. Or it just might be a good way to learn something new for a blog post or just your own education.

I decided that this would be a cool opportunity to add some features to the batch runner I created for my friend. One item that was immediately needed changing was the ability to choose the extension of the files to process. My initial choice was to process mpg files as the default extension. My friend immediately changed it to mp4. This is a useful extension point and the first thing to parameterize.

This post will focus on the Python version first. We’ll look at the C# version in our next post. One way we could hack this together would be to use Python’s sys.argv[] array which provides positional arguments to Python programs. For instance if we called our program with the following statement:

python copy run_cc.py .mp4

we could access the .mp4 with sys.arg[0]
While this works it will cause problems in the long haul if we add or remove parameters. It is also not very intuitive. It would be better to call the with a named parameter. For example:

run_cc.py –extension .mp4

Python has a built-in library to do this exact thing. This library is known as argparse. To implement our first option we need to do the following:

  1. Add an import argparse to the imports section of our program
  2. Create an argument parser object and add an argument to it. Your code will look like this:
parser = argparse.ArgumentParser()
parser.add_argument("--extension", help="Extension of files to convert", default='.mpg')

args = parser.parse_args()

There is a lot going on with just these few lies of code. What this set of code does is 1) Create an argument parser, 2)Adds a parameter called –extension to the command line. This parameter will be added the args array as a property with the name extension. parameter. Finally this code specifies a help description and a default parameter value. Our program code now looks like:

import os
import subprocess
import argparse

parser = argparse.ArgumentParser()
parser.add_argument("--extension", help="Extension of files to convert", default='.mpg')
args = parser.parse_args()

directory_to_import = 'D:/Data/clients/RodPaddock/CCExtractor/'
extractor_exe_path = 'D:/Data/clients/RodPaddock/CCExtractor/ccextractorwin'
for file in os.listdir(directory_to_import):
  if file.endswith(args.extension):
    print(os.path.join(directory_to_import, file))
    subprocess.run([extractor_exe_path,   os.path.join(directory_to_import, file)])

The next step is to add a parameter to specify the directory you wish to read files from. We’ll call the parameter –directory and will default it to (.) the current working directory. A sample call would be as follows:

python run_cc.py 
    --extension .mp4 
    --directory "D:/Data/clients/RodPaddock/CCExtractor/"

Your Python code will now looks like this:

import os
import subprocess
import argparse

parser = argparse.ArgumentParser()
parser.add_argument("--extension", help="Extension of files to convert", default='.mpg')
parser.add_argument("--directory", help="Directory to process", default='.')
args = parser.parse_args()

extractor_exe_path = 'D:/Data/clients/RodPaddock/CCExtractor/ccextractorwin'
for file in os.listdir(args.directory):
  if file.endswith(args.extension):
    print(os.path.join(args.directory, file))
    subprocess.run([extractor_exe_path,   os.path.join(args.directory, file)])        


Finally lets get rid of the EXE path. We are going to “cheat” a bit on this one. We are simply going to add that directory to the PATH statement on the machine. This will sync its operation with the behavior on the Mac.

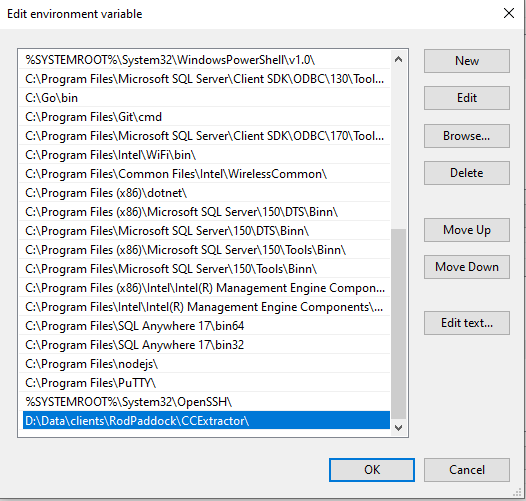
To change your PATH statement in Windows open the Environmental Variables from the Windows Start menu find PATH in the System variables and add the path to wherever you extracted the ccextractor application. The following screen demonstrates how this should look:

Image of changes to PATH statement in Environmental Variables Screen.
Changes to PATH statement in Environmental Variables Screen.

Now your final Python program will look like this:

import os
import subprocess
import argparse

parser = argparse.ArgumentParser()
parser.add_argument("--extension", help="Extension of files to convert", default='.mpg')
parser.add_argument("--directory", help="Directory to process", default='.')
args = parser.parse_args()

# should be added to the system PATH statement
extractor_name = 'ccextractorwin' 
for file in os.listdir(args.directory):
  if file.endswith(args.extension):
    print(os.path.join(args.directory, file))
    subprocess.run([extractor_name,  os.path.join(args.directory, file)])        


This completes part 2 of this series. In part 3 we will learn how to accomplish the same feature using C# across multiple platforms.